-
Malte Matthey authoredMalte Matthey authored

- ROS Noetic Standard Container with Preinstalled Learn Environment Plugin
- Features
- Installation
- Local Windows Installation
- Local Linux Installation
- Functions
- Desktop Environment (Dev Container setup only)
- Start the Learn Environment tutorial
- Control the Real Panda
- MoveIt Position Controller
- Cartesian Impedance Controller
- Panda Gazebo (Simulation)
- Cartesian Impedance Controller
- MoveIt Position Controller
- Create Your Own Package/Node
- Error Handling
- Problems Cloning the Development Container on a Remote PC
- Container Doesn't Start on Linux (MIT-Magic Cookie)
- GPU Not Found
- No Realtime Kernel
ROS Noetic Standard Container with Preinstalled Learn Environment Plugin
WARNING: This README is for setting up the container with all functionalities. For the Learn Environment Plugin, follow the instructions in this README first. After the installation, refer to GETTING_STARTED.md for starting the tutorial or CONTRIBUTE.md for contribution guidelines (creating new tasks & extending the plugin) in the plugin's repository.

This repository provides a Visual Studio Code development container with ROS Noetic installed to control a Franka Panda Robot in both simulation and real environments. It also has the Learn Environment plugin for RViz preinstalled and is optimized so you can start learning how to work with the robot immediately.
Features
- ROS Noetic
- Support for Franka Panda
- Precompiled MoveIt
- Preinstalled Learn Environment plugin for RViz
Installation
When to use which setup:
Benefits of Dev Containers:
- Easier setup
- No worries about connecting the display due to Web Desktop Environment
Benefits of using Docker and attaching VS Code afterwards:
- Still very easy setup
- Less overhead
- Faster build
- Display forwarding already implemented
- Easier to enable GPU support on non-NVIDIA graphic cards
- Native application windows without the need for NoVNC or other web-based desktop virtualization.
Local Windows Installation
Using Dev Container
- Install Visual Studio Code
- Install the Dev Containers extension (ID: ms-vscode-remote.remote-containers)
- Install WSL2
- Install Docker
- You may need to install docker-compose with
pip install docker-compose
- You may need to install docker-compose with
- Create an SSH key in your WSL environment and add it to your git.ssc.kit.edu SSH keys. Explanation
- Clone the repository in your WSL environment:
git clone --recurse-submodules git@gitlab.kit.edu:kit/aifb/BIS/lehre/seminare/programmieren_3/202425/gruppe-3/containerized-setup-learn-environment-franka-emika-panda.git - Open the repository folder in VS Code.
- Open the container in a Docker environment:
Select
ctrl + shift + pDev-Containers: Open in Container. All necessary tools will be installed.
Docker setup & attach VS Code
- Install Visual Studio Code
- Install the Docker extension (ID: ms-azuretools.vscode-docker)
- Install the Dev Containers extension (ID: ms-vscode-remote.remote-containers)
- Install WSL2
- Install Docker
- You may need to install docker-compose with
pip install docker-compose
- You may need to install docker-compose with
- Create an SSH key in your WSL environment and add it to your git.ssc.kit.edu SSH keys. Explanation
- Clone the repository in your WSL environment:
git clone --recurse-submodules git@gitlab.kit.edu:kit/aifb/BIS/lehre/seminare/programmieren_3/202425/gruppe-3/containerized-setup-learn-environment-franka-emika-panda.git - Open the repository folder in VS Code.
- Build the container:
./build.ps1 - Start the container:
./run.ps1 - Attach VS Code to the container:
- Click on the Docker extension (left sidebar in VS Code).
- Find the running container, right-click on it, and select
Attach VS Code. This will open a new VS Code window inside the container.
- Make the display available for the container:
- Install VcXsrv.
- Start the
XLaunchApplication (e.g. from Windows Start Menu) - Select
Multiple windowsand setDisplay numberto0. Clicknext. - Select
Start no client. Clicknext. - Also check the
Disable access controlbox. Clicknextandfinish.
Local Linux Installation
Using Dev Container
- Install Visual Studio Code
- Install the Dev Containers extension (ID: ms-vscode-remote.remote-containers)
- Install Docker
- Create an SSH key in your WSL environment and add it to your git.ssc.kit.edu SSH keys. Explanation
- Clone the repository in your environment:
git clone --recurse-submodules git@gitlab.kit.edu:kit/aifb/BIS/lehre/seminare/programmieren_3/202425/gruppe-3/containerized-setup-learn-environment-franka-emika-panda.git - Open the repository folder in VS Code.
- Open the container in a Docker environment:
Select
ctrl + shift + pDev-Containers: Open in Container. All necessary tools will be installed.
Docker setup & attach VS Code
- Install Visual Studio Code
- Install the Docker extension (ID: ms-azuretools.vscode-docker)
- Install the Dev Containers extension (ID: ms-vscode-remote.remote-containers)
- Install Docker
- You may need to install docker-compose with
pip install docker-compose
- You may need to install docker-compose with
- Create an SSH key in your WSL environment and add it to your git.ssc.kit.edu SSH keys. Explanation
- Clone the repository in your environment:
git clone --recurse-submodules git@gitlab.kit.edu:kit/aifb/BIS/lehre/seminare/programmieren_3/202425/gruppe-3/containerized-setup-learn-environment-franka-emika-panda.git - Open the repository folder in VS Code.
- Build the container:
./build.sh - Start the container:
./run.sh - Attach VS Code to the container:
- Click on the Docker extension (left sidebar in VS Code).
- Find the running container, right-click on it, and select
Attach VS Code. This will open a new VS Code window inside the container.
Functions
Desktop Environment (Dev Container setup only)
Access the desktop environment of the container in your browser at http://localhost:6080/. All windows you open in the container will be shown here.
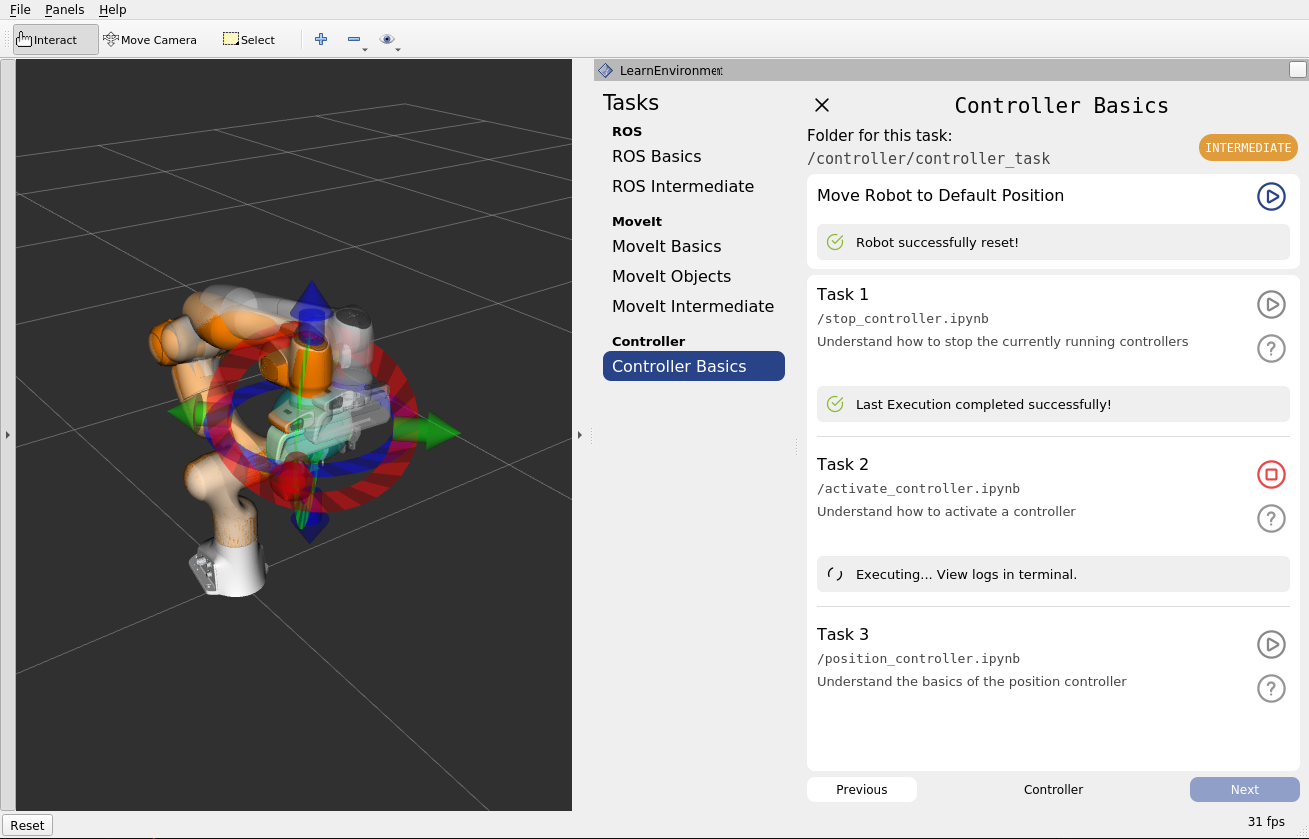
Start the Learn Environment tutorial
To get started with the plugin, follow the instructions provided here. If VS Code does not automatically open the /catkin_ws/src/learn_environment/tasks folder, please navigate to it manually. This is the starting point of the tutorial.
Control the Real Panda
Activate the Panda FCI in the DESK environment with "Activate FCI". The robot LEDs should turn blue.
MoveIt Position Controller
To control the Panda with MoveIt, execute:
roslaunch panda_moveit_config franka_control.launch robot_ip:=172.16.0.2You can use RVIZ and MoveIt to send the robot to coordinates in the desktop environment.
If the robot gets stuck or you move it by hand, recover it with:
rostopic pub -1 /franka_control/error_recovery/goal franka_msgs/ErrorRecoveryActionGoal "{}"Cartesian Impedance Controller
To control the Panda with a Cartesian impedance controller, execute:
roslaunch franka_example_controllers cartesian_impedance_example_controller.launch robot_ip:=172.16.0.2You can move the robot in RVIZ in the desktop environment.
Panda Gazebo (Simulation)
Cartesian Impedance Controller
To simulate the Panda with a Cartesian impedance controller, execute:
roslaunch franka_gazebo panda.launch x:=-0.5 \
world:=$(rospack find franka_gazebo)/world/stone.sdf \
controller:=cartesian_impedance_example_controller \
rviz:=true
This opens RVIZ and Gazebo with a simulation of the Panda robot.
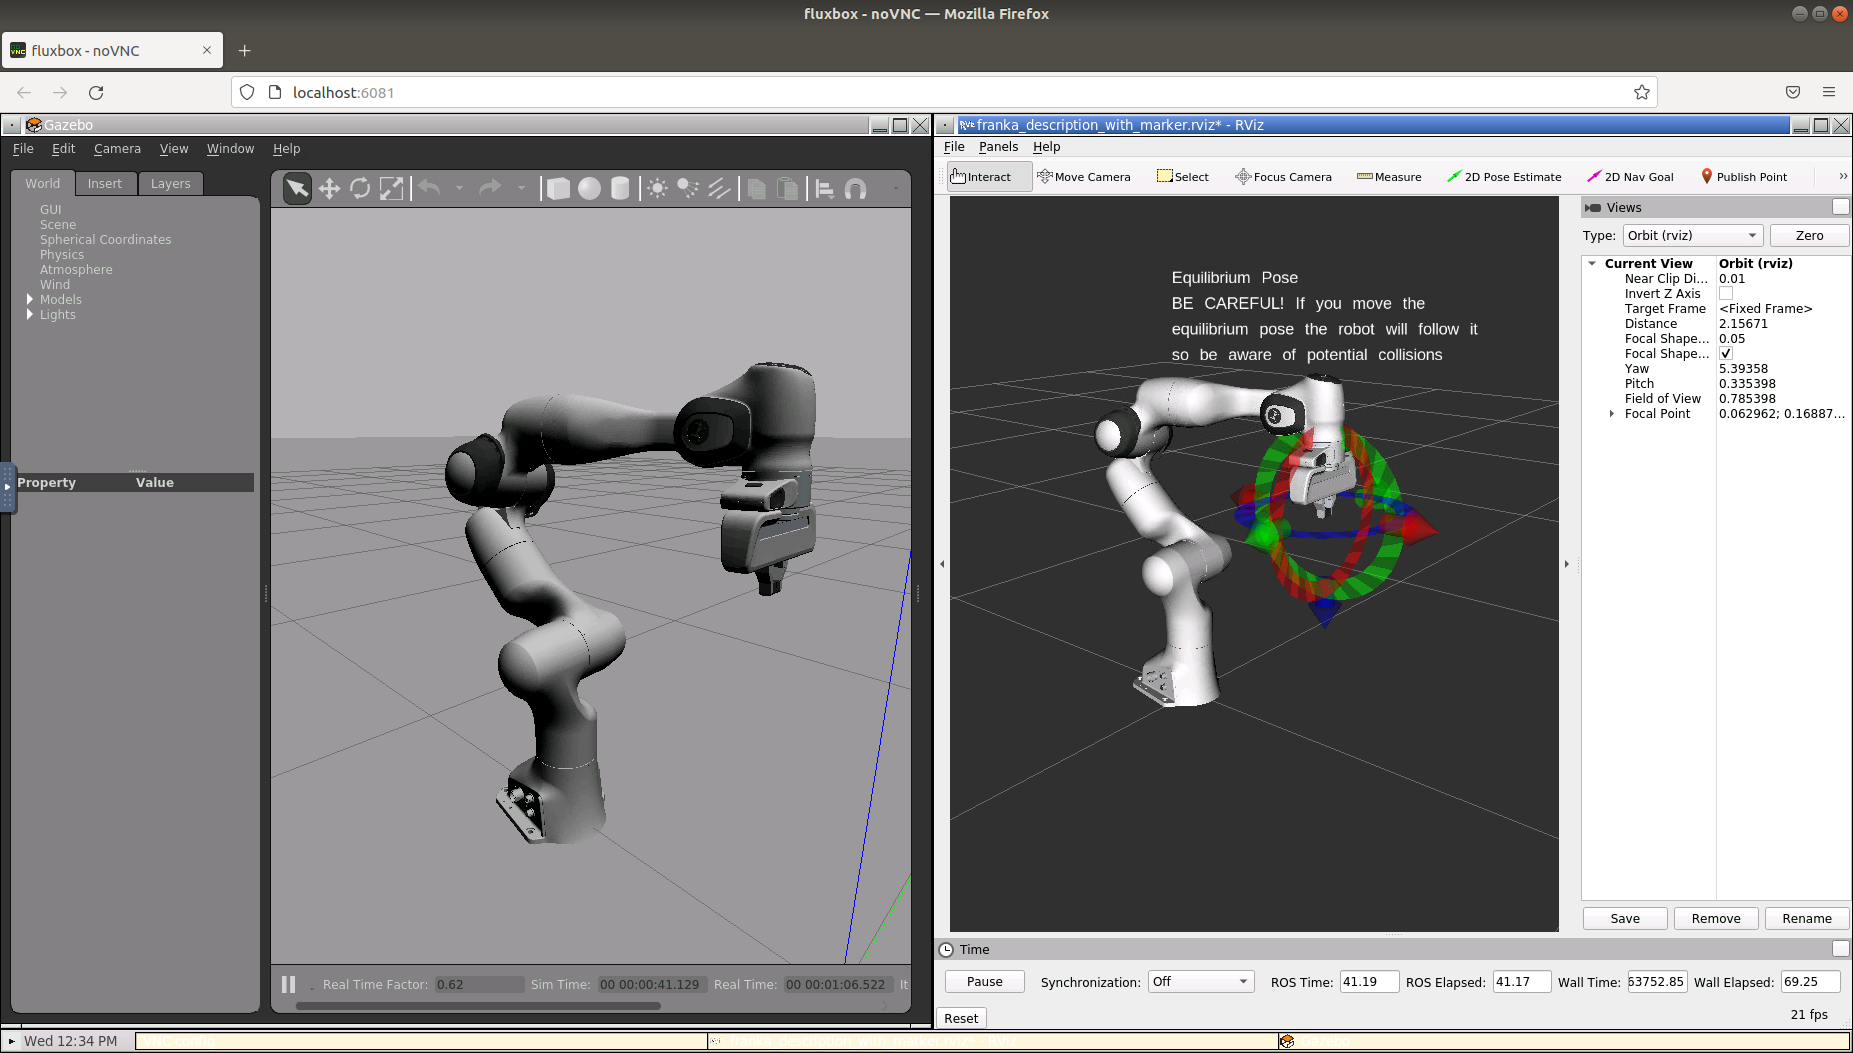
MoveIt Position Controller
To simulate the Panda with a MoveIt position controller, execute:
roslaunch panda_moveit_config demo_gazebo.launch rviz_tutorial:=trueThis opens RVIZ and Gazebo with a simulation of the Panda robot. You can add a motion planner in RVIZ if needed.
Create Your Own Package/Node
To create your own ROS package, create a catkin package in /workspace/catkin_ws/src. You can also clone another ROS package and work with it. Create a ROS Package
Compile the workspace with catkin_make in /workspace/catkin_ws. To use the compiled functions, source the workspace setup.bash with:
source /workspace/catkin_ws/devel/setup.bashError Handling
Problems Cloning the Development Container on a Remote PC
Try cloning the repository in another folder.
Container Doesn't Start on Linux (MIT-Magic Cookie)
Activating CPU virtualization might help.
GPU Not Found
Enable GPU support for the container with:
deploy:
  resources:
    reservations:
      devices:
        - capabilities: ["gpu"]
Just uncomment these lines in docker-compose.yml.
No Realtime Kernel
The Franka Panda requires a realtime kernel. If you don't have one, install it following this explanation. Reboot and choose the realtime kernel in the advanced settings.